Advanced Backup
Caution: The advanced backup function is not compatible with SQL 2008 and SQL Express 2008.
Caution: Backing up to a file should only be used if you do not have a tape backup located on the Juris data host machine (typically the server machine). Creating a backup to file does not protect you against hard drive failure, so it is imperative that you move the completed backup file to a removable media like a CD, DVD, tape, or ZIP disk once the backup file has been created. Once the backup utility is launched, you will see the screen below. Click the forward arrow to continue.
Backup to a File
You will find the Juris Advanced Backup Wizard in the Juris Management Console. The console is installed on the administrative workstation(s). To open the console, click Start > Programs > Juris > Juris Management Console or you may execute the JurisManagementConsole.msc file which is located in the C:\Program Files\ Juris\bin directory.
To use the Advanced Backup function, perform the following:
- Right click on the Database folder in the Juris Management Console and select All Tasks>Backup. See Figure 1.0
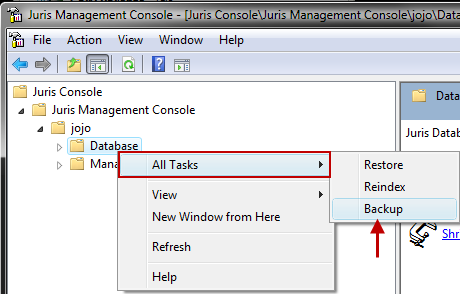 Figure 1.0
- Backing up to a file should only be used if you do not have a tape backup
located on the Juris data host machine (typically the server machine).
Once
the backup utility is launched, click the
forward arrow to continue. See Figure 2.0
 Figure 2.0
- The next screen will ask you to select a backup device. You
should have only ONE backup device. Once you create the device, you should
always use that device for backups. If you do not have a backup device
listed, use the drop-down arrow to select <New Backup Device>. See Figure 3.0
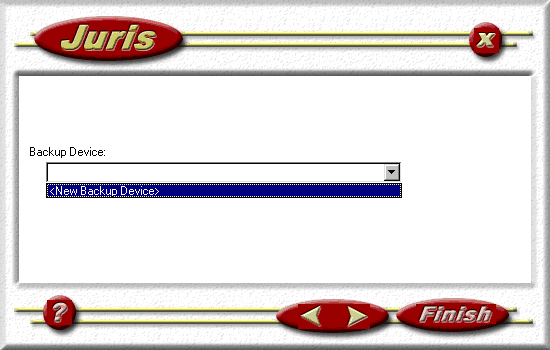 Figure 3.0
Note: In the Juris Management Console, the drive “C” is NOT the C drive of the administrative workstation. The drive shown in the Management Console is the C drive of the server.
- If you selected to create a new backup device in the previous step,
you will see the Add New Backup Device. Select the
File option to create a ‘backup to file’ device. Type
a path and filename in the box to the right. You can also use the ellipsesbutton to select an alternative path.
The filename should have a .BAK extension. This
path and filename will be used to create all of your Juris backups.Once
you have selected a path and filename, click the OK button. See Figure 4.0
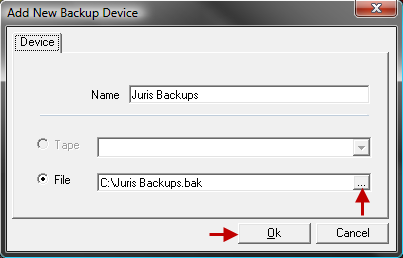 Figure 4.0
- Select the device you created and click the forward arrow.
- On the next screen, you will be prompted to enter a Media Name and Media Description. The Media Name is a ‘label’ that is digitally written on the *.BAK file. Your choice for the media name should be exactly what you will write on the label that you place on the physical backup media (CD, tape, etc.). If you select the default given, then you must label your media accordingly. See Figure 5.0
Tip: Being consistent in your naming conventions here will eliminate confusion during the restore process.
Figure 5.0
Note: The Format Media check box is only available if backing up to tape.
- Click the forward arrow to continue.
- Enter a Backup Name, Backup Description and Expiration. The backup name must be unique. Typically you should accept the default. The backup description is for your use only and is not required in the backup or restore process. The expiration date defaults to 7 days from the date the backup is made. The expiration date is a security feature to prevent you from initializing a backup accidentally. Future dates can be entered, past dates cannot. See Figure 6.0
Tip: If you are making your Monthly or Annual backup, you should change the expiration date to prevent prematurely overwriting the backup (for example, your monthly backup created on January 31st should expire on April 29th. Your Annual backup created on December 31, 2002 should expire on December 30, 2003).
Figure 6.0
- The next screen shows the backup options you have chosen. If you think any selections need to be changed, you can now use the back arrow to return to screens to make changes. This is your last chance to cancel the backup process (you could cancel it by clicking the red “X” button at the top of the screen). Carefully review your selections and click the Finish button to proceed with the creation of your backup. Processing will begin, as indicated on the screen. See Figure 7.0
Note: If you should decide to cancel (using the yellow/red X button) the backup process after clicking Finish, the backup will actually continue to run. Once the Juris database has finished backing up, however, the process will stop before backing up Jbills. This is important to note because you will actually have a backup in place that has an expiration date as set in the backup routine. This is a partial backup that cannot be used or restored. This only applies to file backups, not tape backups.
Figure 7.0
- Once the backup is complete, a report similar to that shown below is created. This report confirms that you have created a backup successfully. You can print this report for record-keeping purposes if necessary. See Figure 8.0
Figure 8.0
Note: If you fail to delete the backup from the drive after moving it to your “portable” storage device (tape, CD, etc.) and try to backup over it, you will receive a message similar to the screen below. Click OK, delete the backup from the drive, and perform the backup again.
Backup to Tape
- Launch Backup Utility. Click
the forward arrow to continue. See Figure 9.0
 Figure 9.0
- The next screen will ask you to select a backup device. A device is
equivalent to a tape drive. You
should have only ONE backup device. Once you create a backup device, you
should always use that device to make backups. If you do not have a backup
device in your list, select <New Backup Device>. See Figure 10.0
 Figure 10.0
- If you selected to create a new backup device in the previous step,
you will see the Add New Backup Device screen shown below. Select the
Tape option to create a ‘backup to tape’ device. This
device will be used to create all of your Juris backups. The Backup Wizard
will locate any valid tape drives on your system. You will only be allowed
to select the tape drive from the drop-down list. You will not be able
to type in a path. See Figure 11.0
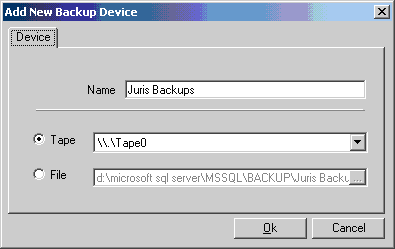 Figure 11.0
- Click the OK button. to add the new device and you
will return to the screen where you
select the backup device. Select the device name you created using the
screen above and click the right arrow to continue. See Figure 12.0
 Figure 12.0
On the next screen, you will be prompted to select a Media Name and Media Description. The Media Name is a label that is digitally written on the tape.
Tip: If you select the default given, then you must label your tape accordingly, or you can change the Media Name to match what you will place on your label (for example: Monday, Tuesday, Wednesday, etc….). Being consistent in your naming conventions here will eliminate confusion during the restore process.
- The Format Media check box is only available
if backing up to tape. Checking this box will force the tape to be automatically
reformatted. This formatting should only be used to prepare tapes that
have been previously used for a backup by a different backup software
other than the Juris Management Console. Do not check this box unless
you want to overwrite the stored information on the media regardless of
expiration date! When all selections have been made, click the forward arrow
to proceed. See Figure 13.0
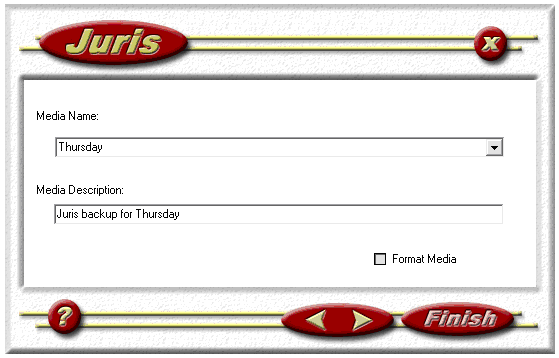 Figure 13.0
 - Next, you are prompted for the backup Name,
Description and Expiration. The backup name must be unique. Typically
you should accept the default. The backup description is for your use
only and is not required in the backup or restore process. The expiration
date is a minimum of 7 days from the date the backup is made. The expiration
date can always be increased, but you cannot decrease it. If you are making
your Monthly or Annual backup, you should change the expiration date to
prevent prematurely overwriting the backup (for example, your monthly
backup created on January 31st should expire on April 29th. Your Annual
backup created on December 31, 2XXX should expire on December 30, 2XXX+1).
Once you have made your selections, click the forward arrow to continue. See Figure 14.0
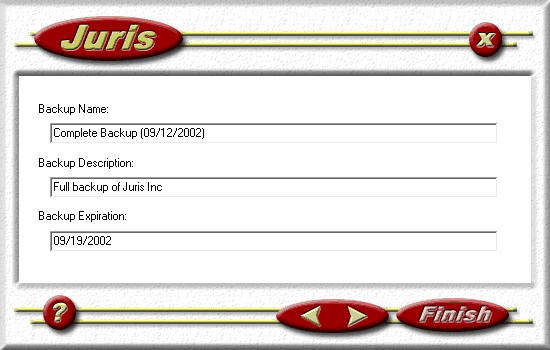 Figure 14.0
 - The management console will display the
selections you have made like shown below. This is your last chance to
cancel the backup (you could cancel by clicking the red button with the
“X”). Carefully review the selections and click the “Finish” button to
continue with the backup. Processing will begin, and display a message. See Figure 15.0
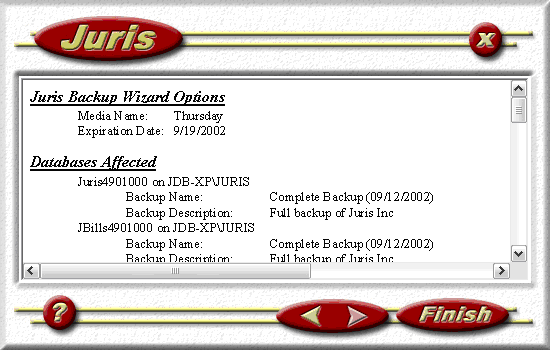 Figure 15.0
- When the backup is complete, a report similar
to the one shown below will print. This confirms the backup and may be
printed for record keeping purposes. See Figure 16.0
 Figure 16.0
 - Now remove the backup tape from the tape drive. The expiration date will prevent you from prematurely overwriting each tape. Since the system will not allow you to write to a tape until the expiration date has passed, you should have a separate tape for each day of the week.
Tip: To safeguard against fire or natural disaster, it is suggested that you physically take your backup off site each night.
 Related Topics